Newbie Teepee Tutorial by Amy Jo
This tutorial is a short tutorial on how to make a newborn tent. Now if you would like to make a larger scale tent all you have to do is upgrade your twine or use rope :)
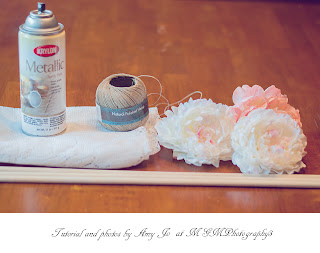
- Gather your supplies, you are going to need:
Twine, Spray paint (optional), Flowers (or any adornment), dowel rods, and fabric, glue gun and glue sticks (not pictured.)
Note: My fabric are two white lace valances from my local thrift store and only cost me .75 cents!
2. (Optional) Spray paint your dowel rods, allow to dry for about 20 min (depending on paint type.) Cut your twine I cut mine at about 50 inches just because I wanted enough length to wrap around many times. Criss cross your painted dowel rods just as you would form a teepee. Now wrap your twine, there really is not method to this just wrap, and wrap, and wrap some more until it feels snug and secure. We definitely want it secure because you do not want it to fall on those precious newbies! This is an up close picture.

This is a pull back picture of the twine wrap completion.

3. Now I got my trusty lace valance curtains and since they are lace I just pushed my dowel rods through the existing lace holes, very easy. However if you are not using lace feel free to bunch your fabric together atop your dowel rods (my recommendation is to leave the tops of your dowel rods exposed above the twine wrap.) and use some more twine, or ribbon to secure your fabric. Now get your trusty glue gun and glue your adornments on, as seen here I used large flowers. Also a sidenote, I did sew my two valances together in the back along the longest vertical length (where they would normally hang on the dowel pocket.)


5. And now here is my completed teepee just waiting for some newbie girls I have coming next week.

Please do not use this tutorial for resell and pose it as your own tutorial for personal or financial gain. You may however use your finished product from this tutorial in any way. Please tag, or share my FB or Morgan's FB and blog as the original citing source. You may also pin this to your hearts content, just please again cite properly. I hope you enjoy this tut.
Show how much you love Morgan's blog and become a follower! Follow Morgan on the Gold Hope Project and show your support for finding a cure for childhood cancer, be a photographer with a purpose.
 Guest blogger Amy Jo Wagner,
is a stay at home mom, military wife, crafter, student and
photographer. As a guest blogger she hopes to teach you all how to craft
on a budget for personal use or photography use . Her current eye candy
comes from Morgan Kervin, Rita of The CoffeeShop Blog and Pink Paisley Photography.
Guest blogger Amy Jo Wagner,
is a stay at home mom, military wife, crafter, student and
photographer. As a guest blogger she hopes to teach you all how to craft
on a budget for personal use or photography use . Her current eye candy
comes from Morgan Kervin, Rita of The CoffeeShop Blog and Pink Paisley Photography."My real job is being a stellar mother and wife, my hobbies are crafting and photographing life's special moments"
Websites: http://www.mrswags80.etsy.com/
http://www.mrswaggy.etsy.com/
http://www.mgmphotography3.com/
Blog: http://monkeyandabeesittinginatree.blogspot.com/
Facebook: https://www.facebook.com/pages/MGMPhotography3/142781549125516


Ahh!! I absolutely love this tutorial, and can't wait to make one for my niece's session (expected late October). I wonder if you might tell me where you found that adorable blanket in the final photo?
ReplyDeleteI don't know where she got hers, but I've seen this done as a DIY rug: http://www.myloveofstyle.com/2013/04/10/diy-shag-rag-rug-tutorial/
DeleteI want to know what I can use instead of flowers for a boy! Love this!!!