Tutorial Tuesday: My workflow
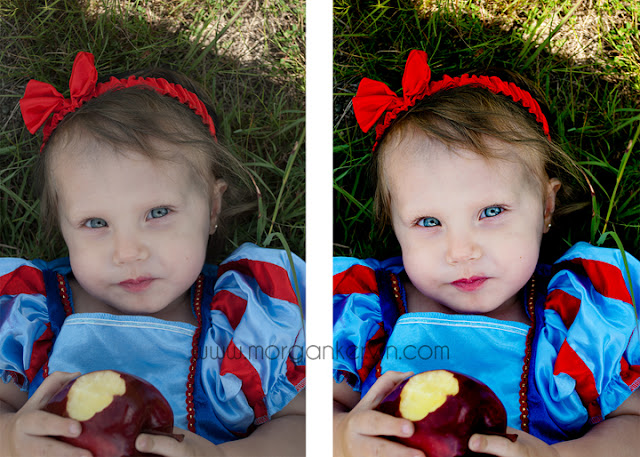
This is my BASIC workflow
No cloning, or real touch ups.
My clarity action does most of this plus it has a layer to make the skin creamy, to add warmth, no-harm dodging and burning, and take the red out.
Once I have completed a session I plug my camera into my computer and save all the files from the session in their own folder. I also save them to my external hard drive and a CD.
To comb through the images I open the folder and use my windows photo viewer.
I go through first and delete any with terrible exposure, horrible faces or any with a bad angle or distractions
Once I delete all the blatantly bad images I pick my five favorite and edit them in Photoshop.
Once I do that I go through the images again with a more critical eye and any that really don't work aesthetically I delete.
Edit next five favorite in Photoshop
Go through images again and delete those with bad composition
Edit next five favorite in Photoshop
Go through and pick the last five best images from the ones left and edit them in Photoshop.
Doing this allows me to get the cream of the crop from the session to my clients.
Now to my editing workflow
Select my favorite image and open the RAW file in ACR
I adjust my blacks to 12-15, vibrance 20-30 and saturation 10
Then in curves I adjust the highlights +10 and shadows -10 for a small S-curve
Then I adjust the noise reduction
I am now finished in ACR and going to make adjustments in PS
First I do a levels adjustment
I have a preset of my grey card so I select that then flatten my image
Next I am going to highlight details such as the eyes, nose, mouth and hair start by duplicating your image.
You will apply a high pass filter
Set to 10, you can see the outlines it will highlight
Set the layer to soft light or overlay (your preference)
Then you want to add a layer mask that hides the effects of the high pass filter so that you can use a white brush to reveal what you want defined.
Check to make sure all of these are correct.
1. Layer mask is black with a white line around it which means it is the active layer
2. You have a white brush selected
3. The brush is soft
Now use your soft white brush to apply the definition to the eyes, nose, mouth and hair and flatten.
Now to brighten up the eyes
Use a brightness/contrast adjustment layer
Set both to 100
I know it looks crazy right now, but we'll fix it :)
Now you want to change the blend mode to luminosity which will allow the brightness and contrast without effecting the color of the eyes.
Then you want to fill that white layer mask with black, I just use my paint bucket and set my swatch to black.
Then use the soft white brush on the black layer mask to paint the effect onto the iris and pupil
Bring the opacity to taste. For lighter eyes I use 20-30, for darker eyes 75-85
Flatten and duplicate the image.
Then on the duplicated layer I apply a screen layer blend mode change
Then adjust the opacity to taste
Then I want to make it more colorful for the last step by applying a vibrance adjustment layer
I usually put it around 50
Now you can have fun making it your own :)


Wow, that's a lot of steps. I just adjust exposure, vibrance, luminance, and blacks etc in Lightroom then run through noiseware, then do an eye pop.
ReplyDeleteMaybe I'm doing it wrong.
AWESOME Morgan! I love it thank you! And I will be getting that action!
ReplyDeleteThanks for this! I liked the beginning about whittling down your images. I too often want to keep to much. I think showing your clients only your best stuff is important. And as usual...thanks SO MUCH for the tips!
ReplyDeleteoh wow, as an editing newb...Im completely overwhelmed!
ReplyDeleteThis is awesome Morgan! Thank you for posting this! Can I ask though ... exactly what do you mean by a preset for your grey card? I know how to make levels presets but exactly what did you use? Did you scan your grey card? Do you take a photo of your grey card at each location and make a new preset for every shoot? Then do you use the eyedropper tool in Levels? I know, I'm a pain. :o)
ReplyDeleteThis is very helpful! I just started shooting in RAW so this is still a little overwhelming for me. This might be a dumb question but what do you do when you are done in ACR before opening the file in PS? Do you save the file over the original RAW file or create another one? How does this work in PSE because from what I understand, PSE doesn't read RAW files?
ReplyDeleteGreat information! Thanks so much!
ReplyDeleteWow thats awesome thank you for sharing ;)
ReplyDelete