Tutorial: Creating a watermark
A wonderful tool for photographers is to make a watermark and use it! When I put up images on an on-line gallery, my website, or facebook page they have my watermark on them, that way anyone who sees the image knows it was produced by me :)
I make my watermark on my own (shown in this tutorial) and I use Rita's Watermark Action Kit to websize and apply my watermark to my images as well as add frames, rounded edges, drop shadows or just plain jane.
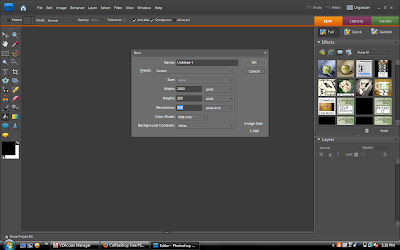
The first step in making your watermark is to open a new blank file. You do this by going to file>new>blank file. The size of the file depends on your watermark size.
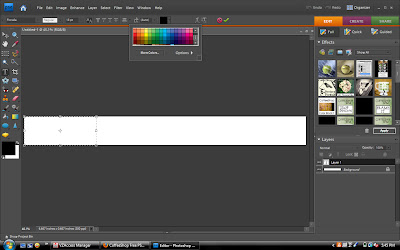
I selected white for my background color because I like the "bar" across the image holding my watermark. You can select any color you like.
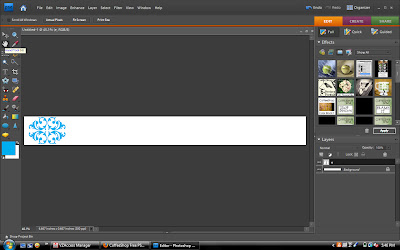
Next I use my text box to create a spot I want to add my dingbat....lol just so silly of a name. You can select any font, size and color by using the menu at the top (as shown).
Add your font and place, and re-size as necessary. I set the dingbat layer to 75% opacity.
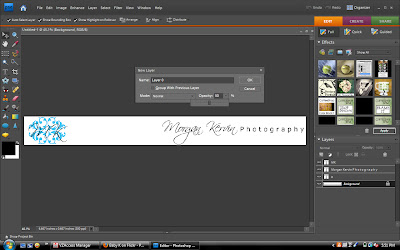
On a new text layer add your name as well as any overlying text.
Once I have finished adding my text I adjust the bottom layer (background) by double clicking and adjusting the opacity to 50%.
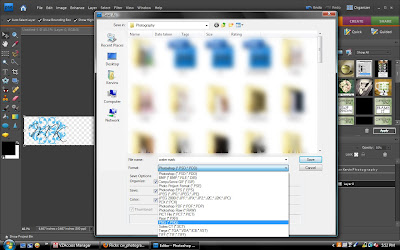
I save it as a .png file so that the layer opacity stays the same as I apply it on images.
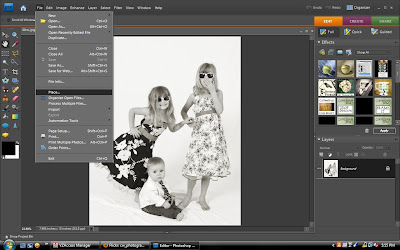
Next when you apply the watermark (if you don't use an action). Open your image and go to file>place and select your .png watermark.
Then you adjust the size and location of your watermark and save :)
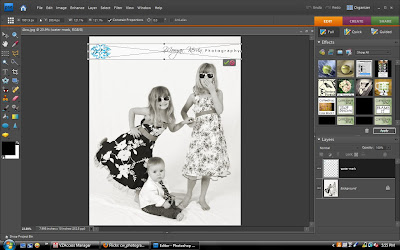
Final watermarked image:

Have a great time experimenting and making your own watermark!
I make my watermark on my own (shown in this tutorial) and I use Rita's Watermark Action Kit to websize and apply my watermark to my images as well as add frames, rounded edges, drop shadows or just plain jane.
The first step in making your watermark is to open a new blank file. You do this by going to file>new>blank file. The size of the file depends on your watermark size.

I selected white for my background color because I like the "bar" across the image holding my watermark. You can select any color you like.
Next I use my text box to create a spot I want to add my dingbat....lol just so silly of a name. You can select any font, size and color by using the menu at the top (as shown).

Add your font and place, and re-size as necessary. I set the dingbat layer to 75% opacity.

On a new text layer add your name as well as any overlying text.
Once I have finished adding my text I adjust the bottom layer (background) by double clicking and adjusting the opacity to 50%.

I save it as a .png file so that the layer opacity stays the same as I apply it on images.

Next when you apply the watermark (if you don't use an action). Open your image and go to file>place and select your .png watermark.

Then you adjust the size and location of your watermark and save :)

Final watermarked image:

Have a great time experimenting and making your own watermark!


Thanks so much! I was wondering how I was going to make one. Great website, btw.
ReplyDeleteAgain Thanks!
Hooray! Thank you so much for this tutorial. Just purchased PSE 8 & have started to "play." Your instructions were SUPER easy to follow. Hugs & Blessings!
ReplyDeleteI am so happy to see this tutorial Morgan...I love the bands on the watermarks!! Thanks!!!
ReplyDeleteGREAT!!! Just what I was looking for :) but how do you remove the watermark for printing?
ReplyDeleteIf you're going to print it, just don't apply the watermark :)
ReplyDeleteThank you for your tutorial, I just finished following along and created one for myself. You have a great website and thank you for sharing so much knowledge.
ReplyDeleteThanks for sharing Morgan.
ReplyDeleteHow do I incorporate my logo art? I designed my own (no use of dingbats) that I have saved in a .jpg and .tiff file. I am assuming that this artwork with my logo type will have to be processed first to eliminate my white background? I want the space around my art and type to be transparent so that my pictures behind it, will show through the spaces (which are currently opaque white). How do I import my logo file, separate it from the white background, and finally, save it so that I can use it on all my pictures in the future? I can't seem to find a tutorial explaining how to do this for photoshop element users. I just purchased PSE9 and am pretty new at this. Anyone know where I can find a tutorial for putting an existing logo onto pictures? Thanks!!! -Tami A.
ReplyDeleteTami
ReplyDeleteYou should use your magic eraser and erase the opaque background and save it as a .png file if you need full color.
If you want just a one color flatten your files. Then select all (in the top menu bar) then edit>define brush preset and save it :)
Thank you, Morgan! I am going to try this now. I appreciate your guidance and suggestions. Looks like I found a new "favorite" site for my photoshop elements help! I will let you know how it worked...until then, I am off to try this. I am sooo excited! -Tami
ReplyDeletePS-Do I just open this tiff file of my logo up on PSE9 and use my magic eraser? Or do I need to do anything else, like create any additional layers?
Yep you can open the .tiff file :)
ReplyDeleteYou are simply AWESOME!!!! Thank you!!!!!!
ReplyDeleteWhere did you find you little "dingbat" ? Is it something from Elements?
ReplyDeleteOMGosh girl I love you!!! Thank you for your awesome tutorial!
ReplyDeleteThank you for posting this...it was very helpful. However, I couldn't find "dingbats". lol Where do I look? Thanks! Oh, and is there a way to save this as a brush? Or is it best to just select it and "place" it onto my photos? Thanks again!!
ReplyDeleteDingbat refers to graphic text - you can find some at places such as fontsquirrel.com
ReplyDeleteYou can save it as a brush, tutorial can be found here: http://rachelbrenke.com/blog/how-to-create-a-watermark-brush-in-photoshop/