How to make a Burlap Swag Banner
How to make a Burlap Swag Banner
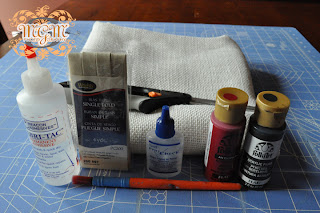
Gather your supplies, you will need:
-Fabri Tac
-Scissors
-Burlap
-Selected paint colors
-Paint brush
-Fray Check
-Bias Tape
-Measuring tape (for fabric, not pictured)
-Stencils (you can make your own with a craft exacto type razor and thick scrapbook paper)
Start off by laying out your burlap, you can iron on a low setting if it is stretched or wrinkled. Optional-I also Febreeze my burlap because it does have a natural smell to it. Then cut a small starter cut at the bottom of your burlap. Burlap is a very difficult fabric to cut straight but there is a trick to cutting in a straight line as pictured below. Grab a string where you cut your burlap and pull that string all the way out.


Please excuse my unpolished/unkempt nails I have been terribly busy chasing babies and working lately! This is what the fabric will look like with the string pulled.

I used the string pulling method for all areas that I wanted to cut so that I could keep my lines straight. I then cut my hanging portions of my burlap banner in 5 inch sections.


Next I created my stencils I used my cricut to cut my stencils but you can either buy your own stencils at Michaels, Wal Mart, Hobby Lobby, or you can create your own! Create your own by printing out the letters in a bold large print from your computer then cut the letters out, trace the letters on thick scrapbook paper. Use your craft exacto razor to cut the letters out that you have traced on your thick scrapbook paper, and voila! Stencils!
Take your new stencils and place them on your burlap where you would like to paint the letters.

I use the “blotting” method of painting and paint around the outer edges of my stencils first. The blotting method seems to work better than brush stroking.


Most Bias Tape will come in 3 yards section pieces. I cut mine to about a yard, cut yours as long as you would like to fit the width of your backdrop or what have you. Next grab your bias tape, ribbon, or cording and turn it over and put your glue along side of the back, place your burlap pieces and glue. Now use your fray check to go along all the outside of your banner burlap pieces. You can further fray the outer edges by pulling 2 or three of the outer strings.

Ok so this is what your banner is going to look like when you are done with it! I have afixed mine to my backdrop and it is ready for my Valentines day shoot! I figured it was time for my dogs to get hitched!
Ok, so it is not my best work and the groom looks like he had a wee bit to much "punch" before the reception...but hey the banner looks great!

 Guest blogger Amy Jo Wagner, is a stay at home mom, military wife, crafter, student and photographer. As a guest blogger she hopes to teach you all how to craft on a budget for personal use or photography use . Her current eye candy comes from Morgan Kervin, Rita of The CoffeeShop Blog and Pink Paisley Photography.
"My real job is being a stellar mother and wife, my hobbies are crafting and photographing life's special moments"
Websites: http://www.mrswags80.etsy.com/
http://www.mrswaggy.etsy.com/
http://www.mgmphotography3.com/
Blog: http://monkeyandabeesittinginatree.blogspot.com/
Facebook: https://www.facebook.com/pages/MGMPhotography3/142781549125516
Gather your supplies, you will need:
-Fabri Tac
-Scissors
-Burlap
-Selected paint colors
-Paint brush
-Fray Check
-Bias Tape
-Measuring tape (for fabric, not pictured)
-Stencils (you can make your own with a craft exacto type razor and thick scrapbook paper)

Start off by laying out your burlap, you can iron on a low setting if it is stretched or wrinkled. Optional-I also Febreeze my burlap because it does have a natural smell to it. Then cut a small starter cut at the bottom of your burlap. Burlap is a very difficult fabric to cut straight but there is a trick to cutting in a straight line as pictured below. Grab a string where you cut your burlap and pull that string all the way out.


Please excuse my unpolished/unkempt nails I have been terribly busy chasing babies and working lately! This is what the fabric will look like with the string pulled.

I used the string pulling method for all areas that I wanted to cut so that I could keep my lines straight. I then cut my hanging portions of my burlap banner in 5 inch sections.


Next I created my stencils I used my cricut to cut my stencils but you can either buy your own stencils at Michaels, Wal Mart, Hobby Lobby, or you can create your own! Create your own by printing out the letters in a bold large print from your computer then cut the letters out, trace the letters on thick scrapbook paper. Use your craft exacto razor to cut the letters out that you have traced on your thick scrapbook paper, and voila! Stencils!
Take your new stencils and place them on your burlap where you would like to paint the letters.

I use the “blotting” method of painting and paint around the outer edges of my stencils first. The blotting method seems to work better than brush stroking.


Most Bias Tape will come in 3 yards section pieces. I cut mine to about a yard, cut yours as long as you would like to fit the width of your backdrop or what have you. Next grab your bias tape, ribbon, or cording and turn it over and put your glue along side of the back, place your burlap pieces and glue. Now use your fray check to go along all the outside of your banner burlap pieces. You can further fray the outer edges by pulling 2 or three of the outer strings.

Ok so this is what your banner is going to look like when you are done with it! I have afixed mine to my backdrop and it is ready for my Valentines day shoot! I figured it was time for my dogs to get hitched!
Ok, so it is not my best work and the groom looks like he had a wee bit to much "punch" before the reception...but hey the banner looks great!

 Guest blogger Amy Jo Wagner, is a stay at home mom, military wife, crafter, student and photographer. As a guest blogger she hopes to teach you all how to craft on a budget for personal use or photography use . Her current eye candy comes from Morgan Kervin, Rita of The CoffeeShop Blog and Pink Paisley Photography.
"My real job is being a stellar mother and wife, my hobbies are crafting and photographing life's special moments"
Websites: http://www.mrswags80.etsy.com/
http://www.mrswaggy.etsy.com/
http://www.mgmphotography3.com/
Blog: http://monkeyandabeesittinginatree.blogspot.com/
Facebook: https://www.facebook.com/pages/MGMPhotography3/142781549125516


Comments
Post a Comment