Getting to Know Your Camera {Aperture and Depth of Field - People}
If you are just starting to read the "Getting to Know Your Camera" series, each post builds upon the previous posts. So, before we begin, if you are new to this series, I wanted to post links to the previous tutorials so that you could catch up. Or, if you aren't new, but want to review before you read this post, you may also find these links helpful.
#1 PASM Settings
#2 Exposure
#3 Aperture and Depth of Field (Macro)
Yesterday was such a beautiful day, so I decided to take the kids in the backyard. Of course, I had a hidden agenda - I wanted to get some pictures for this post! All of the pictures I'm using today will be of my 5-year-old, Sean. Sean cooperates when I say, "Okay, now hold still, I need to change something." My almost 2-year-old, Ashlynn, isn't to that stage yet. Although, I have to say, I think there are times when Sean gets tired of seeing my camera. :)
In the last post, I showed you how simply changing your aperture setting changed how your background looks. Here's an example of that with Sean - this first shot was taken with my aperture set at f/9 (a smaller opening):
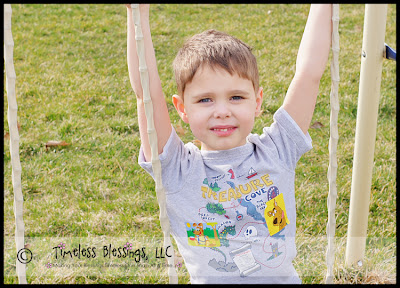
Compare that to this next shot taken with my aperture set at f/2.2 (a much larger opening):

You can see that the blades of grass aren't nearly as clear in the second picture as they are in the first. I personally like the second shot much better because it isolates Sean as my subject. I don't seem to notice the grass as much as I do in the first picture.
In an effort to isolate your subject, it is possible to make your depth of field too narrow. One time, I took a picture of my daughter, and the tip of her nose was crystal clear...the rest of her face, however, was not. At the time, I was still in a photography class, so I showed the picture to my instructor to ask what happened. He said that because I was using a larger aperture, I was too close to her to have all of her face within my depth of field. He said that my options would be: 1) to leave the aperture the same, but step back and zoom in on her to increase my depth of field, or 2) stay just as close to her, but use a smaller aperture. So, let me use Sean to illustrate:

In this shot, I set the aperture to f/2.2, and I was standing pretty close to him. The tip of his nose is very clear. His eyes aren't as in focus as his nose, and his ears are out of our depth of field. I have seen and taken pictures similar to this in which this was actually the desired effect. But, what if you want more of him to be in your depth of field? If you didn't want to change your settings, you could take a big step back and increase your depth of field that way. But, let's stay where we are and snap another one at f/4.5:

Okay, his ears aren't crystal clear, but they are more in focus than before. But, you may also notice that even though the background is out of focus, it is definitely not quite as blurry as it was in the previous shot. (Can you tell he's getting tired of smiling for me? lol) Because the smaller aperture let in less light, I had to adjust my shutter speed. The first image was shot at 1/4000 (as fast as my camera can go!), while the second was shot at 1/1250.
As I mentioned, there are other ways to make your depth of field more wide or shallow besides simply changing your aperture setting. One of those ways is to change your position. The further you are from your subject, the wider your depth of field will be - even if you zoom in. In the following three pictures, I left my aperture set at f/2.2, but stepped away further for each shot. (I couldn't zoom in because I wasn't using a zoom lens, so I tried to crop the second and third ones more)


(Sean wanted to make a mean face for these...I figured he'd earned it) In the first shot, take a look at the shed and the fence behind Sean. They are pretty blurry. In the second shot, they are both more clear and even clearer in the third shot.
This is actually a handy piece of info to have when you are shooting groups. When you are shooting more than one person, you have to be sure to have a wide enough depth of field to have everyone in it. Let's say you are in a dark area, and to let in more light, you want to use a larger aperture (or lower f/number). But, you are shooting 4 people and need a wider depth of field. Try stepping back and zooming in on them. You may have to do a few test shots to find the right balance between your settings and your position, but you will find it. Generally speaking, I am most comfortable shooting groups of 3 or 4 at f/5 or f/6, but for groups larger than that, I like to shoot at f/9. While reviewing the images on the camera during test shots, I zoom in on each person's face to make sure that everyone is clear.
So, now that we have talked about changing your position, let's change the subject's position. In the first image, I had Sean stand right up against the house. In the second, I had him take a few big steps forward, and in the third image, he took a few more than that. I tried to stay about 6 or 7 feet away from him by moving when he moved. The aperture was at f/4.5 for all three images. Here's what we have:


(I'm not sure why the frame in the first image is thicker than the rest....hmmmm...) Obviously, if you stand a subject up against your background, the background itself will be in your depth of field. But, in the second image, moving him away blurred our background. It is even more blurred in the third image. The settings weren't changed at all, and I stayed the same distance from him, so our depth of field actually stayed the same - we simply moved away from the house so that it was no longer within the range of focus.
Let's say you are shooting a group in a park, so you have to use an aperture setting of f/9. If you want to get shots of the group where they are clear and the background is really blurry, don't put them in front of a wall. Try to get more shots of them out in the open. If you do that, everything else will be so far away from them that it will be out of your depth of field. Of course, sometimes, you want to get the background in focus as well. In that case, you position your subject(s), yourself, and your camera settings to get the desired result.
Now that you have read this post, go out and practice this. Take one of your kids or a pet or a friend and position them in different places to see what you get. Then try changing your settings. This is one of those skills you will acquire by doing it and practicing. If you are not a manual shooter yet, I'd probably try this in the aperture priority mode for now.
Originally, I was going to make the next post the last one about aperture and depth of field by covering landscape photography. But, after thinking about it, I want everyone to be ready to shoot in manual mode when we go over that. So, in our next post, we will begin to cover shutter speed. Once you are comfortable with that, you can begin practicing the balancing act between shutter speed, aperture, and ISO. :)

Guest blogger is Corrine Corbett of Timeless Blessings, is a stay at home mom and photographer wielding a Sony Alpha 500. As a guest blogger she hopes to teach you all things that will take the frustration out of photography and leave you more and more satisfied with your art. Her current eye candy comes from Morgan Kervin, Denise McCabe and Isabelle LaFrance.
"I have learned so much from other photog bloggers out there.
I'm really looking forward to the opportunity to pay it forward with anything that I learn! :)"


Comments
Post a Comment